
The camera settings used for video on DSLR’s are much different to what you would use for still photography and it’s important to set the camera up correctly for each one to avoid the pitfalls. We need to remember the 5DMKII and other video capable DSLR’s are designed to be still cameras, so we need to transform them into a digital film camera. After shooting with these HDSLR cameras for almost 2 years now on an assortment of films, music videos, corporate and BTS videos, and gathering tips from the leading industry experts, I have found the best settings to turn your still digital SLR into a digital film camera.
So this is how I setup my Canon 5DMKII. The settings also apply to the 1DMKIV and 7D, but the menus are different.
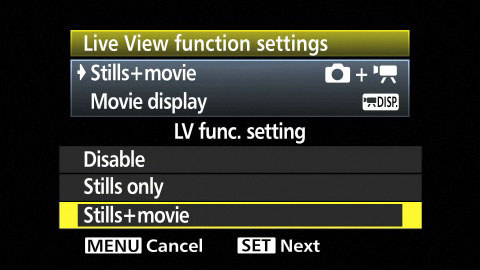
Enable Movie Mode

Well this is the one thing you asbolutely have to do in order to be able to take video in the first place. When the 5DMKII is shipped video mode isn’t enabled so you have to go into the live view settings and make sure stills+movie is selected.
Stop the Live View Mode Shutting Off!

So you’re standing there behind the camera, the scene is set, you’ve set your framing and pulled your focus, and you’re just about to go for a take… then… the live view mode switches off! It’s really annoying and it frustrates the Director who is watching on. It can really upset the flow of things that are happening, and if you make your way to a professional film set, this is something silly you don’t want happening.
This has happened to me a few times and theres a couple things I do to get around it. Firstly, you can extend the auto power off setting so the live view mode will be engaged longer. I have mine set to 4 minutes. I change it depending on what Im shooting, but I never go longer than 8 minutes.
It’s important not to leave it too long or turn it off completely as the camera will get hot, and more heat can lead to more noise and although I have never experienced a camera over heating you may very well be contributing to that happening.
Manually Set Your LCD Brightness

This is an important one for still photography as well as video. The LCD screen can be your best friend or your worst enemy. When you have an LCD screen that is constantly changing its brightness as you move around it is going to throw you off your game. It’s going to trick you into thinking your image might be overexposed or underexposed, and you’re going to regret it afterwards when you load up the footage on your computer.
ALWAYS set your LCD screen to a manual setting, somewhere around 4-5 I find works best. That way your screen is always a constant brightness, and you have a consistent tool to make decisions from. The trick here is to get to know your LCD screen like the back of your hand. When I shoot, I know if my image on my LCD screen looks a tad bright and overexposed, I know I’m pretty much dead on the money. It may not be a completely true representation of the actual image, but if you know how your images relate from your computer screen to your cameras LCD screen, you’re set.
Disable Peripheral Illumination Correction

Peripheral illumination will drive you mad. This is a big one, especially on wider zoom lenses. If you zoom in and out on a scene in Live view, you will notice the exposure changing, especially around the peripheral of the lens(around the edges). What this feature is designed to do is correct vignetting caused by lenses, even though it has become quite popular and photographers tend to add vignettes in post anyway these days. When I shoot video though, I know exactly what I want my exposure to be for the whole frame, I set it, and I dont want the camera trying to correct anything. I want a nice consistent exposure throughout the frame. So turn this puppy off!
Color Space Isn’t Important

For me, I haven’t noticed the slightest bit of difference between these two settings when shooting video, but keep in mind that I haven’t exactly done the most elaborate testing on this particular setting. There have been reports that color space is irrelevant when shooting video and I think I tend to agree based on what I’ve seen. One of these reports comes from Vincent Laforet who is very close to Canon and one of the leading industry evangelists when it comes to HDSLR filmmaking. Some other industry experts such as Shane Hurlburt ASC seem to think that Adobe RGB achieves much nicer skin tones. I’ll leave this one up to you to do your own tests, and use what works for you. So I can’t say for sure, but Id like to put my money on the fact that if you are reading this post, this issue probably isn’t even of any concern to you.
For the record if you’re curious, mine happens to be set to Adobe RGB.
Picture Style Settings for HDSLR Video

Picture styles give you some flexibility with your HDSLR video footage. You should already know the the 5DMKII and other video capable DSLR’s compress the footage into the H.264 finishing format which is a highly compressed codec. It’s kind of like taking a picture in jpeg form. So much like a jpeg, this gives you very little flexibility in post production. What you shoot in the camera is what you get. You cannot un-sharpen your footage in post production and letting the camera sharpen for you will just accentuate any defects that you have which you do not want. It’s also very hard to remove contrast but it is actually very easy to add it. So using the picture styles we can create our own User Defined preset to remove the sharpening, contrast and even saturation performed by the camera to give us a flatter, less saturated image. If you aren’t doing any post production and what you shoot is what you publish, for example for photojournalists, then a simple neutral picture style may suffice. If you do like to edit and grade your footage then you should go for something a little more advanced like below.

This is how my camera is setup. I actually set a User Defined picture style, and use the Neutral picture style as the template to start with with. I then remove all of the Sharpening by setting it to Zero. I don’t want the camera to be doing any of this. For contrast and saturation I remove one and sometimes two stages down from zero as shown in the image above. I often play around with the settings depending on what I’m shooting, and how much flexibility I need in post production.
Technicolour Picture Style
Not so long ago (Apr 2011) Technicolour and Canon got together to produce a new picture style that enables DSLR shooters to shoot a lot more flat and give them more flexbility with their footage in post production. Since the camera isn’t shooting RAW video, it’s important to try record with as little contrast and sharpening as possible. It’s very easy to add contrast and sharpening in post, but its very difficult to take it out. You also don’t want this tiny little camera trying to do more processing than it has to.
This Technicolour picture style gives a much flatter image than you can achieve with the basic picture styles and is quite good for serious DSLR filmmakers.
Disable Highlight Alert

Some people say to disable this but it isn’t necessary. It won’t affect anything in live view mode or when you are recording. When you scroll through your video clips, it will display the highlight alerts in the thumbnail that you see on the back of the camera, but it won’t show you the highlight alert when you play the video back. I turn it off, the alerts bug me.
Disable Auto Lighting Optomizer & Highlight Tone Priority


The Auto Lighting optimizer is another trick the camera has up its sleeve to try and help you. For video however, it isn’t much help, its more of a nuiscance. As I said before, we don’t want the cameras help. The last thing we need while shooting video is for the camera to decide something isn’t right with your exposure, and try to correct it. That’s going to ruin your video. This function helps to bring out shadow details and improve your dynamic range which can be great for stills. Not so much for video. Disable it!

Highlight tone priority tries to hold and supress highlights in order to capture more detail. Sounds great but its another recipe for disaster when shooting video. Reports say that it can increase the noise levels in your image and can also create some unwanted banding. There are some further more technical issues with this that I wont get into, partyl because I dont even understand all the real technical mumbo-jumbo. Its been a common practice by many shooters I know to disable this feature.
Disable High ISO Noise Reduction
Noise reduction involves softening the image and you don’t really want that. I do my best to avoid noise in my video but if I am going to experience noise I prefer to let my computer handle it in post production rather than letting my little camera try to do it on the fly.
What ISO Settings Should I Use for HDSLR Video?
This is definitely worth a mention here. Something very important to remember when setting the ISO of your camera for shooting video is that the lower the ISO does not neccesarily mean the lower the noise. Tests have been done to prove that when shooting video only, the best ISO settings to use are multiple of 160.
The ISO levels in ascending order of noise levels are:
160, 320, 640, 100, 200, 400, 800, 1250, 125, 250, 500, 1000, 1600, 2500, 2000, 3200, 4000, 5000, 6400.
I tend to cap my ISO at 1600 on the 5DMKII. Once you go over that it starts to break down and the noise really kicks in. Noise is the last thing you want because it is just going to get compressed and be accentuated even more in the codec these cameras use. For the 7D I tend to cap at 1600 as well, but sometimes even 800. I don’t believe the 7D sensor can perform as well as the 5DMKII.
Turn Auto ISO Off!
If you camera has an Auto ISO feature, turn this off! Again, you don’t want the camera calculating things for you on the fly as it will ruin your exposure during a take.
Happy filming!
B.


3 Comments
Enter your comments here…Thank you for this Post 😀
Best Regards from Switzerland
Beni
A very hand tutorial! Thank you
Bugger *handy